IBM BAW - Workflow Center installation step by step
IBM® Business Automation Workflow is a platform that enables you to create workflow applications to increase productivity.
In this article, we will present a step-by-step installation of IBM® BAW version 21.0.3. For the installation, we will use the Rocky Linux 9.5 operating system. It is important that if we use a free distribution of the operating system, it should be from the RedHat family. So far, I have performed the installation on CentOS 8, but after it was withdrawn from the market, I decided to test Rocky Linux.
In fact, the IBM® BAW installation consists of three main components:
- IBM® Installation Manager - a tool for managing the installation of IBM products.
- IBM® DB2 Standard - a relational database server.
- IBM® BAW - a WebSphere server with the frontend application of the IBM BAW product.
As a relational database server that will be used by IBM® BAW, we can use any database server that is supported by IBM® BPM.
In our case, for testing and data storage purposes, we will use the included DB2 Standard product, which unfortunately implies the need to install as a super user root.
From the IBM manufacturer's website, we download files with installation packages. In my case, these are three files:
- BAW_Enp_21.0.3_Lnx64_1of3.tar.gz
- BAW_Etp_21.0.3_Lnx64_2of3.tar.gz
- BAW_Etp_21.0.3_Lnx64_3of3.tar.gz
We copy these files to the server where we will install IBM® BAW. In my case, I copied them to the /mnt/h/Instalki/IBM/BAW/ directory.
I created the /opt/IBM/install directory and unpacked the installation files there:
su -
mkdir -p /opt/IBM/install
cd /opt/IBM/install
tar -xzvf /mnt/h/Instalki/IBM/BAW/BAW_Enp_21.0.3_Lnx64_1of3.tar.gz
tar -xzvf /mnt/h/Instalki/IBM/BAW/BAW_Etp_21.0.3_Lnx64_2of3.tar.gz
tar -xzvf /mnt/h/Instalki/IBM/BAW/BAW_Etp_21.0.3_Lnx64_3of3.tar.gz
After unpacking the files we get the directories:
[root@bpmbaw21test install]# ls -la
razem 28
drwxr-xr-x.  8 root     root      120 2021-12-14  .
drwxr-xr-x.  3 bpmadmin bpmadmin   21 01-22 21:50 ..
drwxr-xr-x. 10 root     root     4096 2021-12-15  IM
drwxr-xr-x. 10 root     root     4096 2021-12-15  IM64
drwxr-xr-x. 38 root     root     4096 2021-12-14  launchpad
-rwxr-xr-x.  1 root     root     6178 2021-12-15  launchpad.sh
drwxr-xr-x.  2 root     root     4096 2021-12-15  LICENSES
drwxr-xr-x.  7 root     root       80 2021-12-14  repository
drwxr-xr-x.  3 root     root       17 2021-12-15  responsefiles
Installing IBM® Installation Manager for a Database Product
Our root directory, where we will install the IBM DB2 database product, will be the /opt/IBM/db2 directory. We create it:
mkdir -p /opt/IBM/db2
IBM® Installation Manager is a tool that allows you to install IBM products. To install that tool, go to the IM64 directory and run the installer:
It is worth noting that since we want to install the IBM DB2 Standard product (relational database), the IBM® Installation Manager installation
requires super user root privileges. Use the -accessRights argument to specify whether to install the software as an administrator
(super user) or a regular user:
- To install the software as an administrator, use the
-accessRights adminargument - To install the software as a non-administrative user, use the
-accessRights nonAdminargument.
We run commands:
cd /opt/IBM/install/IM64
./install -accessRights admin
If you receive an error message during the installation of IBM® Installation Manager:
00:00.98 ERROR [main] org.eclipse.equinox.log.internal.ExtendedLogReaderServiceFactory safeLogged
 Błąd aplikacji
 org.eclipse.swt.SWTError: No more handles [gtk_init_check() failed]
 org.eclipse.swt.SWTError: No more handles [gtk_init_check() failed]
   at org.eclipse.swt.SWT.error(SWT.java:4387)
   at org.eclipse.swt.widgets.Display.createDisplay(Display.java:913)
   at org.eclipse.swt.widgets.Display.create(Display.java:899)
   at org.eclipse.swt.graphics.Device.<init>(Device.java:156)
   ...
Then check if you have the X11 presentation service installed and configured correctly. You can read about possible problems with X11 in the article SSH - running programs with a graphical interface.
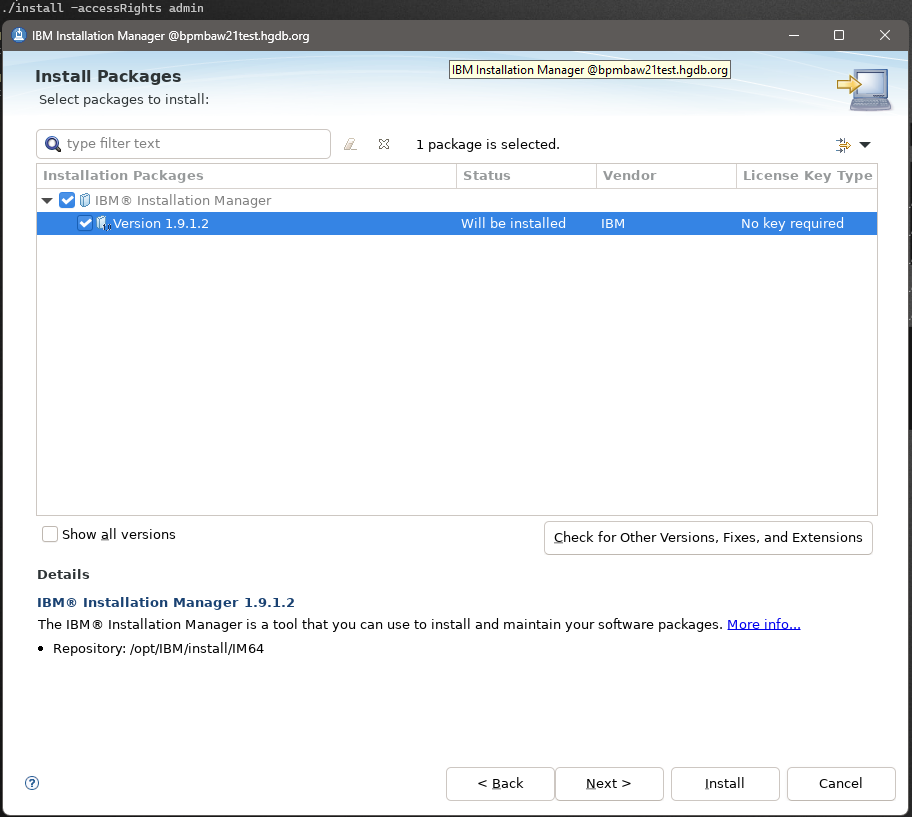
After running the IBM® Installation Manager installer:
- Press the Next > button and follow the instructions on the next screens.
- Accept the terms of the license agreement, press the Next > button.
- Define the directory where 'Installation Manager' is to be installed. Change it to the value
/opt/IBM/db2/InstallationManager/eclipse(remember that we assumed at the very beginning that the main directory in which we will install the IBM DB2 database product will be the/opt/IBM/db2directory), press the Next > button. - A summary window will appear and press the Install button.
- The installation should be successful and a window with the Restart Installation Manager button will appear - press it and the window of the installed Installation Manager will appear:
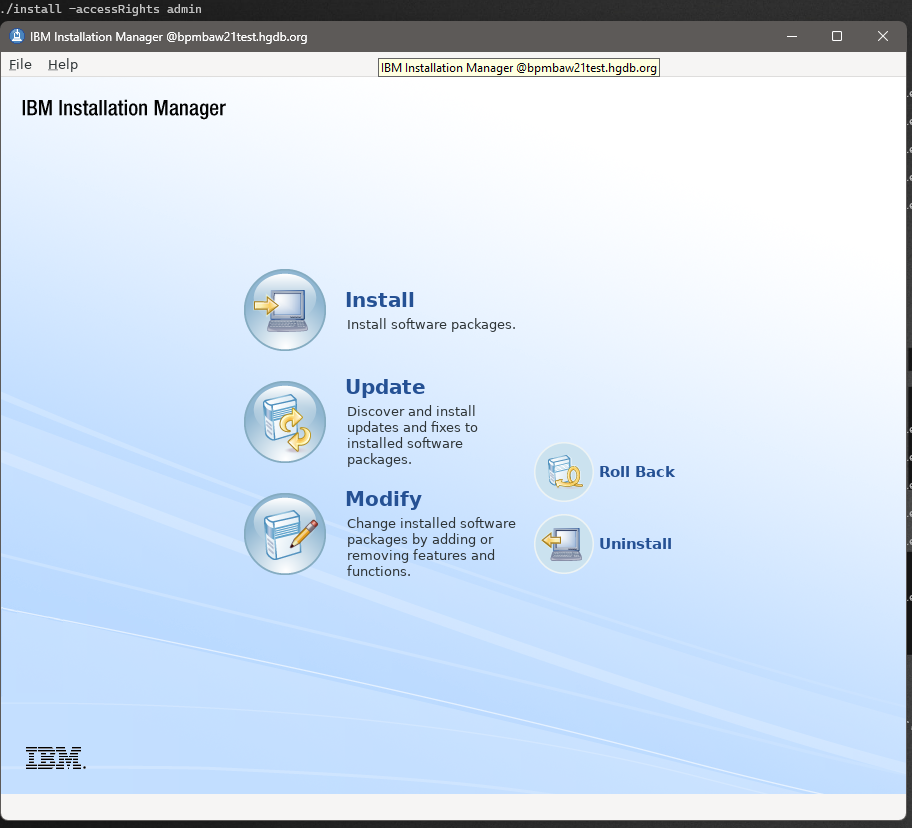
We can close the Installation Manager application for now, we will need it in the future. Now we will move on to the next preparatory operations before installing IBM® DB2 Standard.
Database server installation
Now we will install the database server.
Preparatory work
First, you need to create local users who will be used as special database users (see Db2 users and groups (Linux and UNIX)).
In the previously defined directory /opt/IBM/db2, the home directories of these users will be created.
We create the appropriate groups of local users. We want them to have specific identifiers (id):
groupadd db2iadm1 -g 1001
groupadd db2fadm1 -g 1002
groupadd dasadm1 -g 1003
groupadd bpmadmins -g 1004
We create a DB2 database server instance owner user, under whose rights the DB2 database server instance will be started.
The Db2 instance is created in the owner's home directory. This user controls all Db2 processes and owns all
file systems and devices used by the databases contained in the instance. The default username is db2inst1:
useradd db2inst1 -g 1001 -b /opt/IBM/db2 -m -N
passwd db2inst1
Remember the password you set for the db2inst1 user. We will need it in the later installation.
We create a "fenced" DB2 user. This user is used to run user-defined functions (UDFs) and stored procedures
outside the address space used by the Db2 database. If you don't need this level of security, for example in a test environment,
you can use your instance owner as the fenced user. The default user is db2fenc1 and the default group is db2fadm1:
useradd db2fenc1 -g 1002 -b /opt/IBM/db2 -m -N
We create a DB2 Administration Server (DAS) user. This user is used to run the Db2 Administration Server (DAS) on the system.
There is only one DAS per computer. One DAS server supports one or more database instances, including database instances belonging to
different installations. A DAS server can support database instances that have a lower release level than the DAS server. However, for
database instances that have a higher release level than the DAS server, the DAS server must be migrated to a higher release level.
The DAS server release level must be as high (or higher) than the release level of any of the supported database instances.
The default user is dasusr1 and the default group is dasadm1:
useradd dasusr1 -g 1003 -b /opt/IBM/db2 -m -N
We create a user, the administrator of future databases used by IBM® BAW, and set a password:
useradd bpmadmin -g 1004 -b /opt/IBM/db2 -m -N
passwd bpmadmin
The password for the administrative user bpmadmin will be necessary for later installation.
The user bpmadmin will be used as a technical user to implement communication between the application engine and the database,
in which data related to the definitions of process applications and process instances, metadata of stored documents, etc. will be stored.
Adding a repository of installation packages
To perform the installation, you must add the repository of the installation package in the Installation Manager.
We run IBM® Installation Manager, we run it as the super user root:
cd /opt/IBM/db2/InstallationManager/eclipse
./IBMIM
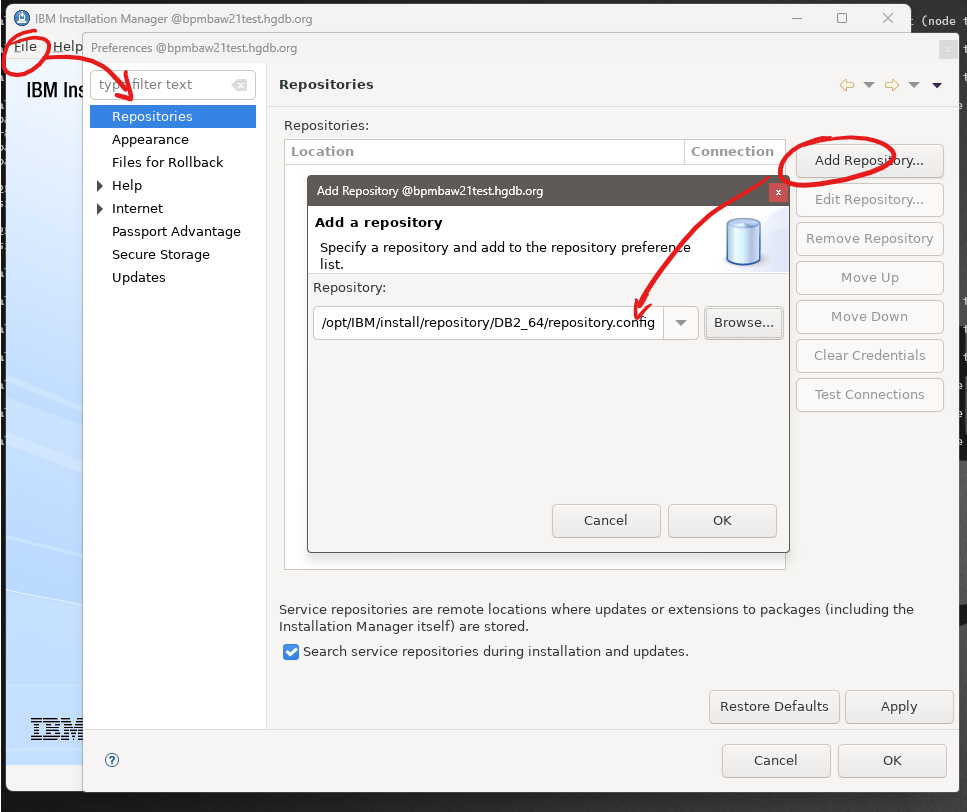
After starting the Installation Manager window, from the top menu (top bar of the window) select "File", then "Preferences": A window titled "Preferences" will open.
On the left side of the window there will be a list of preference categories. The first item is "Repositories" - click the "Add Repository..." button
and point to the files with the repository definition. In our case, the files named repository.config are located in the following directories:
- The DB2 product installation file is located in the
/opt/IBM/install/repository/DB2_64directory. - The BAW product installation file is located in the
/opt/IBM/install/repository/repos_64bitdirectory.
Installation DB2 Database
If we install an IBM DB2 product with a license other than "Express" or "Standard", remember to modify the system parameters responsible for performance, for example:
kernel.shmmni = 4096
kernel.shmmax = 17179869184
kernel.shmall = 8388608
kernel.sem = <SEMMSL> <SEMMNS> <SEMOPM> <SEMMNI>
kernel.sem = 250 256000 32 4096
kernel.msgmni = 16384
kernel.msgmax = 65536
kernel.msgmnb = 65536
vm.swappiness = 0
vm.overcommit_memory = 0
kernel.randomize_va_space = 0
Run IBM® Installation Manager as the super user root:
cd /opt/IBM/db2/InstallationManager/eclipse
./IBMIM
After adding the repository of installation packages, we return to the main IBM® Installation Manager window. We perform the database installation process in the following steps:
- We have the Installation Manager window open. We click on Install.
- A window will appear with a selection of installation packages to install. We select two products:
- IBM WebSphere Application Server Network Deployment (as it turns out, you won't install the database without it).
- IBM DB2 Standard for 64-bit systems
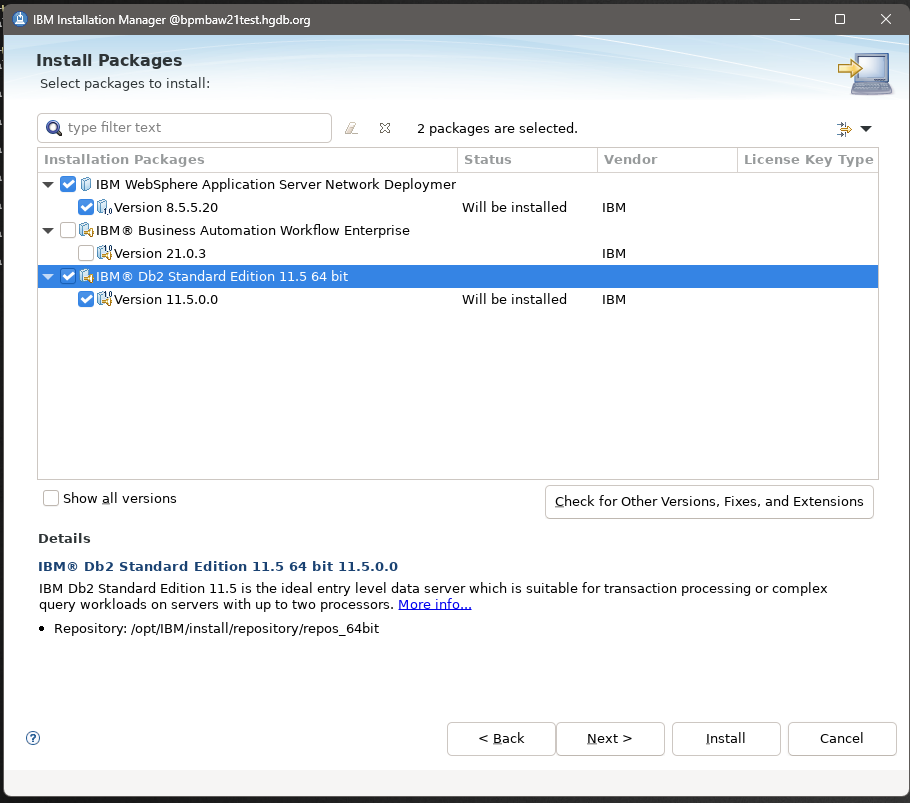
If IBM Business Automation Workflow appears on our leafy products, skip it. We will take care of installing it later.
Press the Next > button.
- Select the installation of recommended fixes included in the installation package and press the Next > button.
- Accept the results of the validation of system conditions performed by the installer.
Ignore the warning: A supported operating system was not detected. Support for your operating system might have been added after the release of the product. See the detailed system requirements Web pages http://www.ibm.com/support/docview.wss?uid=swg27038033 for more information about supported operating systems. You can continue with the installation, but the installation or product operation might not succeed.
Press the Next > button.
- Accept the terms of the license agreements and press the Next > button.
- You will be asked to specify the location of the shared resources directory. Change the default value to
/opt/IBM/db2/IMSharedand press the Next > button. - You will be asked to indicate the location of the resource directory where WebSphere is to be installed. Change the default value to
/opt/IBM/db2/AppServerand press the Next > button. - Select the language versions of the product that will be installed. By default, only the 'English' version is selected, it is the main version and cannot be skipped. Expand Translations supported only by some packages and select 'Polish'. Press the Next > button.
- A window will open with a summary of the installed packages. Press the Next > button.
- In the next step, you will be asked for the configuration parameters of the product being installed. For the DB2 installation package, these will be the user data that we created earlier (during the preparatory work):
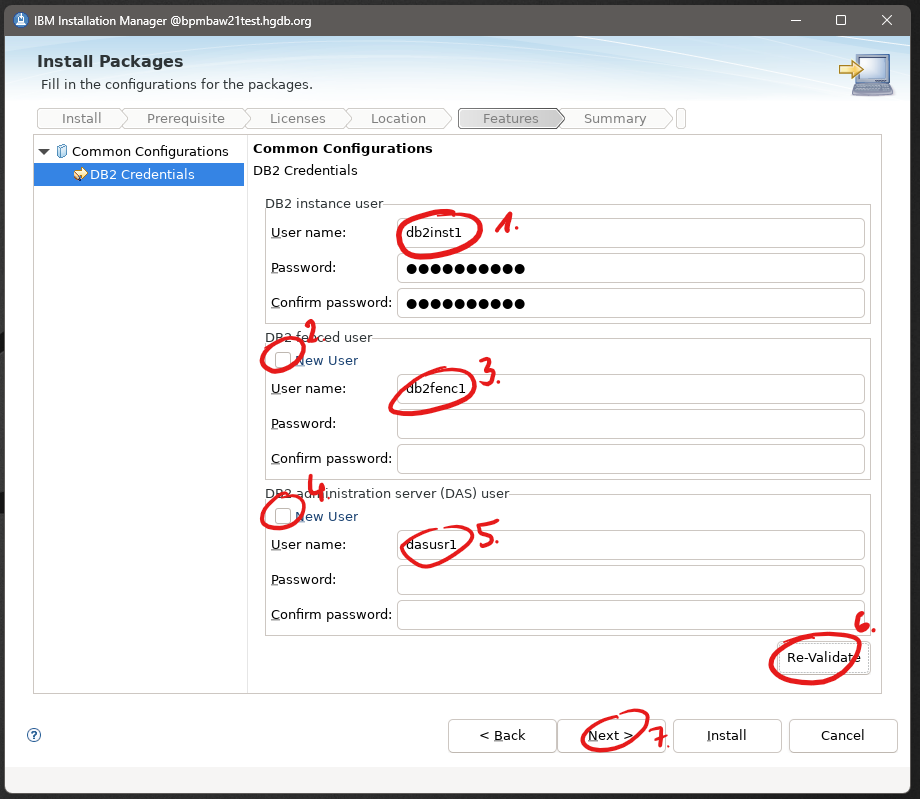
- Enter information about the instance user named
db2inst1. - We have already created the "protected" user, so we uncheck the New User option.
- We enter the name of the "protected" user
db2fenc1. - We have already created the administration server user, so we uncheck the New User option.
- We enter the administration server user name
dasusr1. - We press Re-Validate - at the top, under the title "Install Packages" NOT an error message preceded by the icon ⛔️ should appear.
- We press the Next > button.
In the next step, a window with an installation summary will appear.
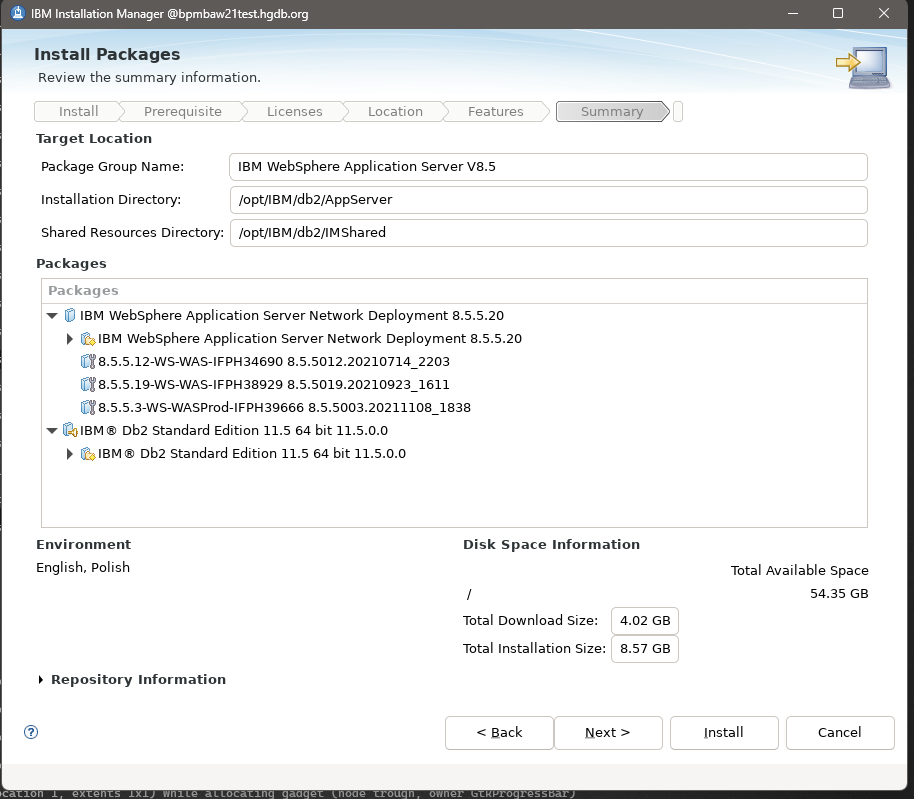
We press the Install button and wait for the process to finish, which may take quite a long time, even 1.5 hours, but it should be successful. After the installation is complete, we will be asked to run another configuration program, but we will stop there by selecting the None option. We press the Finish button and close the IBM® Installation Manager.
To check if the installed database instance is running, simply check if its processes and the administration server processes have been started.
We can do this using the command ps -ef | grep db2:

Starting the database instance
The database instance should be up and running immediately after installation. After restarting the server, the services should start automatically. To start the instance 'manually', we first need to start the administration server:
# Log in as the administration server user
su - dasusr1
# We load the user profile (appropriate environment variables)
. ~/das/dasprofile
# We start the administration server
db2admin start
Now we need to start the database instance:
# Log in as the database instance user
su - db2inst1
# Load the user profile (appropriate environment variables)
. ~/sqllib/db2profile
# Start the database instance
/opt/db2/db2inst1/sqllib/adm/db2start
Stopping the database instance
First, we need to stop the database instance:
# Log in as the database instance user
su - db2inst1
# Load the user profile (appropriate environment variables)
. ~/sqllib/db2profile
# Stop the database instance
/opt/db2/db2inst1/sqllib/adm/db2stop
Now we need to stop the administration server:
# Log in as the administration server user
su - dasusr1
# Load the user profile (appropriate environment variables)
. ~/das/dasprofile
# Start the administration server
db2admin stop
You can read more about the DB2 database in articles about DB2.
DB2 database startup script
To make things easier, we can create a DB2 database startup script. To do this, we create the directory /opt/IBM/db2/bin and the file start-stop-db2.sh in it:
mkdir -p /opt/IBM/db2/bin
cd /opt/IBM/db2/bin
vim start-stop-db2.sh
In the file start-stop-db2.sh we enter:
#!/bin/bash
export BASE_DB2_DIR=/opt/IBM/db2
echo "Service DB2 Process Center - $1"

start()
{
        . $BASE_DB2_DIR/dasusr1/das/dasprofile
        su -c "$BASE_DB2_DIR/dasusr1/das/bin/db2admin start" dasusr1
        . $BASE_DB2_DIR/db2inst1/sqllib/db2profile
        su -c "$BASE_DB2_DIR/db2inst1/sqllib/adm/db2start" db2inst1
}

stop()
{
        . $BASE_DB2_DIR/db2inst1/sqllib/db2profile
        su -c "$BASE_DB2_DIR/db2inst1/sqllib/adm/db2stop" db2inst1
        . $BASE_DB2_DIR/dasusr1/das/dasprofile
        su -c "$BASE_DB2_DIR/dasusr1/das/bin/db2admin stop" dasusr1
}

case "$1" in
        start)
                start
                ;;
        stop)
                stop
                ;;
        restart)
                stop
                start
                ;;
        *)
                echo "Usage: $0 {start|stop|restart}"
esac
We change the permissions of the start-stop-db2.sh file so that only the owner can run the script:
chmod u+x start-stop-db2.sh
Now as the super user root we can start the DB2 database using the command:
/opt/IBM/db2/bin/start-stop-db2.sh start
or stop it using the command:
/opt/IBM/db2/bin/start-stop-db2.sh stop
Installing IBM® BAW
Once the DB2 database server is installed and running, we can proceed to install the IBM® BAW product.
In general, it is NOT recommended to install IBM® BAW on the same server as the database server. However, for testing purposes, we can install both products on the same server.
Preparatory work
We should install the IBM® BAW product with nonAdmin user rights (NOT as the super user root).
Therefore, we need to perform the following preparatory work in the following steps:
- Create the root directory
/opt/IBM/BAWfor the BAW product, where we will install all the necessary components.
mkdir -p /opt/IBM/BAW
- Create a group for (if it does not already exist) e.g.
bpmadminsusing the commandgroupadd bpmadmins -g 1004. - Create a user e.g.
bawadminin thebpmadminsgroup using the commanduseradd bawadmin -g 1004 -b /opt/IBM/BAW -m -N. - Set the password for the
bawadminuser using the commandpasswd bawadmin. - Change the owner of the
/opt/IBM/BAWdirectory to thebawadminuser and thebpmadminsgroup using the commandchown bawadmin:bpmadmins /opt/IBM/BAW. - Optionally, create the
/opt/IBM/installdirectory (if it does not already exist) and change the owner to thebawadminuser and thebpmadminsgroup, and unpack the IBM® BAW installation files into it. - Install IBM® Installation Manager as user
bawadminwith the argument-accessRights nonAdminin the directory/opt/IBM/BAW/InstallationManager/eclipse:
cd /opt/IBM/install/IM64
./install -accessRights nonAdmin
- Add a repository of installation packages (if you don't remember how to do it, you can find the description of the operation here:
Adding a repository of installation packages). We only connect the repository with the IBM® BAW installation files
(for example, a file named
repository.configfrom the directory/opt/IBM/install/repository/repos_64bit). - Continue installing the IBM® BAW product as the
bawadminuser according to the following instructions.
IBM® BAW installation process
After preparing the environment, we can proceed to install IBM® BAW.
Before installing IBM® BAW, allow system processes to open a large number of files. It is recommended to set the minimum value to 8192.
We do this by issuing the command ulimit -n 8192.
In our case, we run IBM® Installation Manager as the bawadmin user:
ulimit -n 8192
cd /opt/IBM/BAW/InstallationManager/eclipse
./IBMIM
- We have the Installation Manager window open. Click on Install.
- A window will appear with a selection of installation packages to install. We select two products:
- IBM WebSphere Application Server Network Deployment.
- IBM Business Automation Workflow
If IBM DB2 Standard appears on our product list, we skip it. We installed it earlier.
Press the Next > button.
- We select the installation of the recommended fixes included in the installation package and press the Next > button.
- We accept the result of the validation of system conditions performed by the installer.
We ignore the warning: A supported operating system was not detected. Support for your operating system might have been added after the release of the product. See the detailed system requirements Web pages http://www.ibm.com/support/docview.wss?uid=swg27038033 for more information about supported operating systems. You can continue with the installation, but the installation or product operation might not succeed.
Press the Next > button
- Accept the terms of the license agreements and press the Next > button.
- You will be asked to specify the location of the shared resources directory. You can leave the default value
/opt/IBM/BAW/IMSharedand press the Next > button. - You will be asked to specify the location of the resources directory where WebSphere and the BAW product are to be installed. Change the default value to
/opt/IBM/BAW/21.0.3and press the Next > button. - We select the language versions of the product that will be installed. By default, only the 'English' version is selected, it is the main version and cannot be skipped. Expand Translations supported only by some packages and select 'Polish'. Press the Next > button.
- A window will open with a summary of the packages being installed.
Remember that now you should select the "license" of the IBM BAW product. To do this, expand the entry related to the IBM BAW product and in our case select "IBM Business Automation Workflow Enterprise Non-production License".
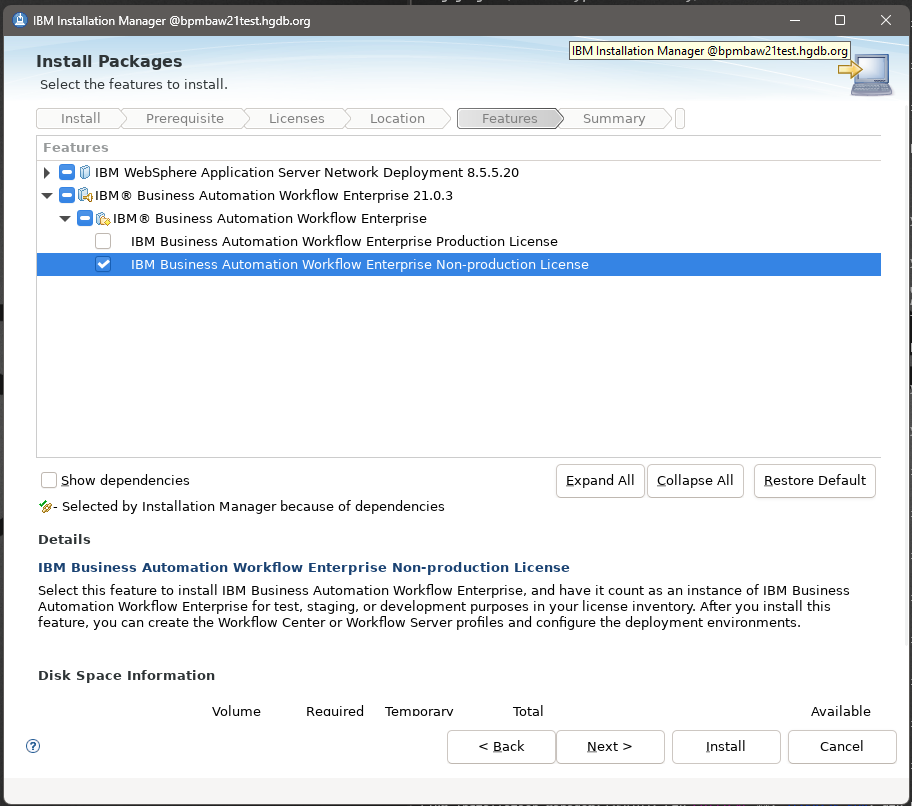
Press the Next > button.
In the next step, a window with a summary of the installation will appear.
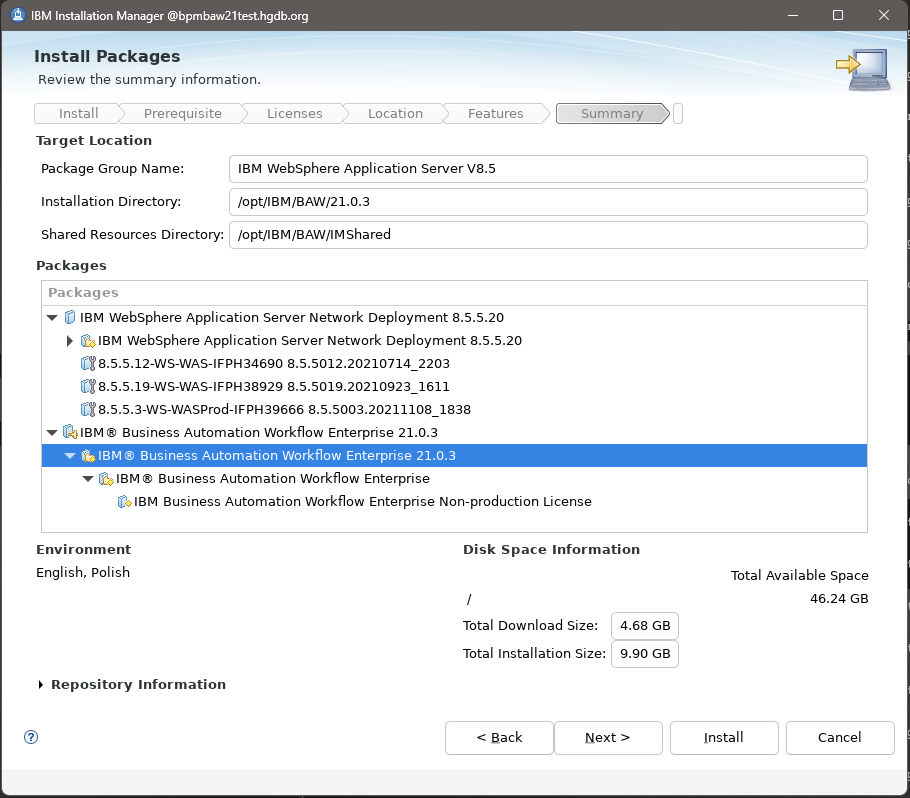
Press the Install button and wait for the process to finish, which can take quite a long time, even 1.5 hours, but should be successful. After the installation is complete, we will be asked to run another configuration program, however, we will stop there by selecting the None option. Press the Finish button and close the IBM® Installation Manager.
Configuring IBM® BAW product profiles
After the IBM® BAW installation is complete, we need to configure the product profiles. Now we need to create a new deployment environment and profiles. For this purpose, we will use the BPMConfig.sh utility.
Preparing the configuration file
In the installed directory /opt/IBM/BAW/21.0.3/BPM/samples/config/ we have subdirectories with sample configuration files.
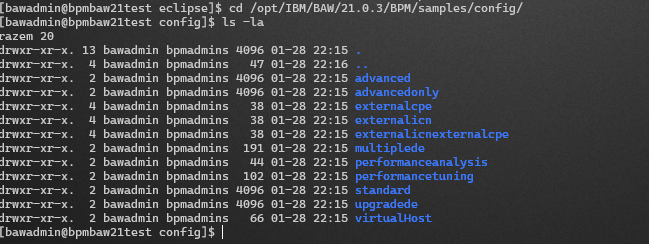
- For the "Advanced" environment installation, select one of the files related to the configuration of this environment, e.g.
advanced/Advanced-PC-SingleCluster-DB2.propertiesand use its example to prepare a configuration that meets our goals. - For the "Express" or "Standard" environment installation, select one of the files related to the Standard environment configuration, e.g.
standard/Standard-PC-SingleCluster-DB2.propertiesand use its example to prepare a configuration that meets our goals. Depending on the environment selected, we set the following:- for "Express":
bpm.de.type=Express - for "Standard":
bpm.de.type=Standard
- for "Express":
The names of the sample configuration files contain information about the configuration they represent. Using the example of the file name
Advanced-PC-SingleCluster-DB2.properties, we can see that this is the configuration of the "Advanced" environment for "Process Center"
in the "SingleCluster" configuration with the "DB2" database.
We select the configuration file that will be the basis for our configuration. In our case, we select the file advanced/Advanced-PC-SingleCluster-DB2.properties:
As the user bawadmin, we copy the configuration file to our home directory:
cd ~
mkdir -p workspace/config
cd workspace/config
cp /opt/IBM/BAW/21.0.3/BPM/samples/config/advanced/Advanced-PC-SingleCluster-DB2.properties bpmbaw21test-PC-SingleCluster-DB2.properties
We edit the bpmbaw21test-PC-SingleCluster-DB2.properties configuration file and adapt it to our needs.
vim bpmbaw21test-PC-SingleCluster-DB2.properties
If there is no such need, you do not have to change all the parameters in the file. Below is the range of parameters that should be changed. Whenever possible, it is worth using the comments contained in the configuration file, which will help you understand the meaning of individual parameters.
Deployment environment definition section
Remember to set the bpm.de.deferSchemaCreation parameter to false
bpm.de.name=De1
# The type of product configuration: Express, Standard, Advanced, or AdvancedOnly.
bpm.de.type=Advanced
# The type of deployment environment: Process Center or Process Server. Use 'Process Center' to create a Workflow Center deployment
# environment and 'Process Server' to create a Workflow Server deployment environment.
bpm.de.environment=Process Center
# Options: 'true' or 'false'. If false is specified, the database schemas are created when the deployment environment is created.
# If true is specified, the database schemas must be created manually using the generated scripts, and the bootstrapProcessServerData
# script must be run manually. When using DB2 for z/OS, the option must be set to true.
bpm.de.deferSchemaCreation=false
# The context root prefix for all web modules in this environment. If set, the context root prefix must start with a forward slash character (/).
bpm.de.contextRootPrefix=
# The virtualHost for all web modules in this environment. If a value is not set for virtualHost, the default value 'default_host' is used.
bpm.de.virtualHost=
# Options: true or false. Set to true to use external IBM Content Navigator.
bpm.de.useExternalNavigator=false
# Options: true or false. Set to true to use external IBM FileNet Content Platform Engine.
bpm.de.useExternalCPE=false
Users managing the environment in WebSphere Integrated Solutions Console
The user who will be the administrator of the environment in WebSphere Integrated Solutions Console. It will be created automatically when the deployment environment is created.
We will define it with the name deadmin.
#######################################################################################################################################################
# Deployment environment administrator authentication alias. It cannot have the same user name as the authentication alias of the cell administrator. #
#######################################################################################################################################################
bpm.de.authenticationAlias.1.name=DeAdminAlias
bpm.de.authenticationAlias.1.user=deadmin
bpm.de.authenticationAlias.1.password=secret
Technical user data for database communication
We use the data of the previously created user bpmadmin, which was created during the preparatory work before the DB2 database installation.
This user was created as a technical user for database communication.
######################################
# Database user authentication alias #
######################################
bpm.de.authenticationAlias.2.name=BPM_DB_ALIAS
bpm.de.authenticationAlias.2.user=bpmadmin
bpm.de.authenticationAlias.2.password=secret
WebSphere cell definition data
For "Express" and "Standard" versions, the bpm.cell.db=CellOnlyDb parameter must be commented out.
############################
# Cell properties: PCCell1 #
############################
bpm.cell.name=PCCell1
# The database at the cell level. This database is only applicable to IBM Business Automation Workflow Advanced and AdvancedOnly configurations.
# The value should correspond to the name of a database that is defined in this file.
bpm.cell.db=CellOnlyDb
WebSphere Cell Administrator Details
The user who will be the cell administrator in WebSphere Integrated Solutions Console. It will be created automatically when the deployment environment is created.
We will define it with the name bawadmin.
##################################################
# Cell (WAS) administration authentication alias #
##################################################
bpm.cell.authenticationAlias.1.name=CellAdminAlias
bpm.cell.authenticationAlias.1.user=bawadmin
bpm.cell.authenticationAlias.1.password=secret
Deploy Manager profile definition
Defining the deployment profile that will be used to create the deployment environment. In our case, this will be the DmgrProfile profile.
Before running the BPMConfig.sh tool, you need to create the profile's home directory:
mkdir -p /opt/IBM/BAW/profiles/DmgrProfile
Remember that the bpm.dmgr.hostname parameter should define the full server name (including the domain). This is related to the generated SSL certificate, which will contain the server name.
If you do not have a defined domain name, define it based on the /etc/hosts file.
In our case, I set the full server name as bpmbaw21test.example.com. The server IP number should be 192.168.56.122.
We implement the entry in the /etc/hosts file:
192.168.56.122 bpmbaw21test.example.com bpmbaw21test
#################################
# Deployment manager properties #
#################################
# The name of the deployment manager node.
bpm.dmgr.nodeName=Dmgr
# The host name of the deployment manager. Do not use localhost for environments that span multiple hosts.
bpm.dmgr.hostname=bpmbaw21test.example.com
# The installation location of the IBM Business Automation Workflow product.
# If you want to use a backslash character (\) in your properties file, you must use an escape backslash
# before it; for example, bpm.dmgr.installPath=C:\\IBM\\BPM\\v8.6.
bpm.dmgr.installPath=/opt/IBM/BAW/21.0.3
# The name of the deployment manager profile.
bpm.dmgr.profileName=DmgrProfile
# The file path of the deployment manager profile. It must be a valid path for the target system and must not be currently in use.
# You must have permissions to write to the directory. To use the default path, do not specify any value for the property.
# If you want to use a backslash character (\) in your properties file, you must use an escape backslash before it;
# for example, bpm.dmgr.profilePath=C:\\IBM\\BPM\\v8.6\\profiles\\DmgrProfile.
bpm.dmgr.profilePath=/opt/IBM/BAW/profiles/DmgrProfile
# Custom options that are passed to the 'manageprofiles' command and used primarily to customize port assignments.
bpm.dmgr.profileOptions=
# To override the default port assignments for this profile, specify a starting port number for generating and assigning ports.
bpm.dmgr.initialPortAssignment=
# The value for the JDBC driver path WebSphere environment variable.
bpm.dmgr.jdbcDriverPath=${WAS_INSTALL_ROOT}/jdbcdrivers/DB2
# The deployment manager SOAP port. This port is used to establish a connection to the deployment manager during the creation of remote nodes. Update this property after you create the deployment manager profile.
bpm.dmgr.soapPort=8879
Defining a node profile in WebSphere
Defining a node profile in the WebSphere Integrated Solutions Console. It will be created automatically when you create a deployment environment.
Before running the BPMConfig.sh tool, you must create the profile's home directory:
mkdir -p /opt/IBM/BAW/profiles/Node1Profile
Remember that the bpm.de.node.1.hostname parameter defines the full server name (including the domain). This is related to the generated SSL certificate, which will contain the server name.
##########################
# Node properties: Node1 #
##########################
bpm.de.node.1.name=Node1
# If the host name is the same as the deployment manager, this node will be created on the same computer. Do not use localhost for environments that span multiple hosts.
bpm.de.node.1.hostname=bpmbaw21test.example.com
# The installation location of the IBM Business Automation Workflow product.
# If you want to use a backslash character (\) in your properties file, you must use an escape backslash before it;
# for example, bpm.de.node.1.installPath=C:\\IBM\\BPM\\v8.6.
bpm.de.node.1.installPath=/opt/IBM/BAW/21.0.3
# The name of the node profile.
bpm.de.node.1.profileName=Node1Profile
# The file path of the managed node profile. It must be a valid path for the target system and must not be currently in use.
# You must have permissions to write to the directory. To use the default path, do not specify any value for the property.
# If you want to use a backslash character (\) in your properties file, you must use an escape backslash before it;
# for example, bpm.dmgr.profilePath=C:\\IBM\\BPM\\v8.6\\profiles\\Node1Profile.
bpm.de.node.1.profilePath=/opt/IBM/BAW/profiles/Node1Profile
# Custom options that are passed to the 'manageprofiles' command and used primarily to customize port assignments.
bpm.de.node.1.profileOptions=
# To override the default port assignments for this profile, specify a starting port number for generating and assigning ports.
bpm.de.node.1.initialPortAssignment=
# The value for the JDBC driver path WebSphere environment variable.
bpm.de.node.1.jdbcDriverPath=${WAS_INSTALL_ROOT}/jdbcdrivers/DB2
SharedDb database definition
The SharedDb database is common to all IBM® BAW components.
Our DB2 database server was installed on the same server as IBM® BAW, so we can use the internal localhost interface for communication.
Do not use the localhost interface when the database server is on a different machine.
The SharedDb database schema should be the same as the technical user name used to communicate with the database,
in our case it takes the value bpmadmin.
#################################
# Database properties: SharedDb #
#################################
# The keyword to use to refer to this set of database properties. This is not the database name.
bpm.de.db.1.name=SharedDb
# The list of available options depends on the product configuration. For a Standard DE, the options are
# ProcessServer, EmbeddedECM, ContentNavigator, DesignObjectStore, TargetObjectStore, PDW, Messaging, and BusinessSpace.
# For an Advanced DE, the options are ProcessServer, EmbeddedECM, ContentNavigator, DesignObjectStore, TargetObjectStore,
# PDW, CellScopedDB, Messaging, BusinessSpace, CommonDB, and BPC. For an AdvancedOnly DE, the options are CellScopedDB,
# Messaging, BusinessSpace, CommonDB, and BPC. For EmbeddedECM, there is no support if the operating system for the
# IBM Business Automation Workflow environment is z/OS.
bpm.de.db.1.dbCapabilities=Messaging,BusinessSpace,CommonDB,BPC
# Options: DB2, DB2zOS, Oracle, or SQL Server.
bpm.de.db.1.type=DB2
# The host name of the database. Do not use localhost for environments that span multiple hosts.
bpm.de.db.1.hostname=localhost
bpm.de.db.1.portNumber=50000
# The name of the database.
bpm.de.db.1.databaseName=CMNDB
# For information about the restrictions that pertain to IBM Business Automation Workflow database schema names,
# see the IBM Business Automation Workflow topic "Configuration properties for the BPMConfig command" in the IBM Knowledge Center:
# https://www.ibm.com/support/knowledgecenter/SS8JB4_18.0.0/com.ibm.wbpm.ref.doc/topics/samplecfgprops.html
bpm.de.db.1.schema=bpmadmin
ProcessServerDb database definition
The ProcessServerDb database is used by the process server.
Our DB2 database server was installed on the same server as IBM® BAW, so we can use the internal localhost interface for communication.
Do not use the localhost interface when the database server is on a different machine.
The ProcessServerDb database schema should be the same as the technical user name used to communicate with the database,
in our case it takes the value bpmadmin.
########################################
# Database properties: ProcessServerDb #
########################################
# The keyword to use to refer to this set of database properties. This is not the database name.
bpm.de.db.2.name=ProcessServerDb
# The list of available options depends on the product configuration. For a Standard DE, the options are
# ProcessServer, EmbeddedECM, ContentNavigator, DesignObjectStore, TargetObjectStore, PDW, Messaging, and BusinessSpace.
# For an Advanced DE, the options are ProcessServer, EmbeddedECM, ContentNavigator, DesignObjectStore, TargetObjectStore,
# PDW, CellScopedDB, Messaging, BusinessSpace, CommonDB, and BPC. For an AdvancedOnly DE, the options are CellScopedDB,
# Messaging, BusinessSpace, CommonDB, and BPC. For EmbeddedECM, there is no support if the operating system for the
# IBM Business Automation Workflow environment is z/OS.
bpm.de.db.2.dbCapabilities=ProcessServer,EmbeddedECM
# Options: DB2, DB2zOS, Oracle, or SQL Server.
bpm.de.db.2.type=DB2
# The host name of the database. Do not use localhost for environments that span multiple hosts.
bpm.de.db.2.hostname=localhost
bpm.de.db.2.portNumber=50000
# The name of the database.
bpm.de.db.2.databaseName=BPMDB
# For information about the restrictions that pertain to IBM Business Automation Workflow database schema names,
# see the IBM Business Automation Workflow topic "Configuration properties for the BPMConfig command" in the IBM Knowledge Center:
# https://www.ibm.com/support/knowledgecenter/SS8JB4_18.0.0/com.ibm.wbpm.ref.doc/topics/samplecfgprops.html
bpm.de.db.2.schema=bpmadmin
Database definition IcnDb
The IcnDb database is used by "Content Navigator", a product of IBM Filenet P8, a document repository.
Our DB2 database server was installed on the same server as IBM® BAW, so we can use the internal localhost interface for communication.
Do not use the localhost interface when the database server is on a different machine.
Also pay attention to the additional parameters:
bpm.de.db.3.schema=ICNSA- the name of the schema in which the tables will be placed different than the user name.
Do not leave the bpm.de.db.3.databaseDataDirectoryPath parameter unset. If you do not set it, the generated database and tablespace creation scripts will be created incorrectly, but you will find out about this only when you want to run them on the database server. What value should I set?
Based on the documentation article Directory structure - default local database directory information for the Db2 instance db2inst1
it appears that the default value is the ~db2inst1/db2inst1/NODE0000 directory. Execute the commands as user db2inst1 on the database server:
cd
HOME_DIR=`pwd`
echo "$HOME_DIR/db2inst1/NODE0000"

So, in our case it will be the value /opt/IBM/db2/db2inst1/db2inst1/NODE0000.
##############################
# Database properties: IcnDb #
##############################
# The keyword to use to refer to this set of database properties. This is not the database name.
bpm.de.db.3.name=IcnDb
# The list of available options depends on the product configuration. For a Standard DE, the options are
# ProcessServer, EmbeddedECM, ContentNavigator, DesignObjectStore, TargetObjectStore, PDW, Messaging, and BusinessSpace.
# For an Advanced DE, the options are ProcessServer, EmbeddedECM, ContentNavigator, DesignObjectStore, TargetObjectStore,
# PDW, CellScopedDB, Messaging, BusinessSpace, CommonDB, and BPC. For an AdvancedOnly DE, the options are CellScopedDB,
# Messaging, BusinessSpace, CommonDB, and BPC. For EmbeddedECM, there is no support if the operating system for the
# IBM Business Automation Workflow environment is z/OS.
bpm.de.db.3.dbCapabilities=ContentNavigator
# Options: DB2, DB2zOS, Oracle, or SQL Server.
bpm.de.db.3.type=DB2
# The host name of the database. Do not use localhost for environments that span multiple hosts.
bpm.de.db.3.hostname=localhost
bpm.de.db.3.portNumber=50000
# The name of the database.
bpm.de.db.3.databaseName=CPEDB
# For information about the restrictions that pertain to IBM Business Automation Workflow database schema names,
# see the IBM Business Automation Workflow topic "Configuration properties for the BPMConfig command" in the IBM Knowledge Center:
# https://www.ibm.com/support/knowledgecenter/SS8JB4_18.0.0/com.ibm.wbpm.ref.doc/topics/samplecfgprops.html
bpm.de.db.3.schema=ICNSA
bpm.de.db.3.tsicn=WFICNTS
# The database data directory is the location where information that is managed by the database is stored.
# Specify the same data directory for each bpm.de.db.databaseDataDirectoryPath.
bpm.de.db.3.databaseDataDirectoryPath=/opt/IBM/db2/db2inst1/db2inst1/NODE0000
DosDb database definition
The DosDb database is used by the "Design Object Store", a product of IBM Filenet P8, a document repository.
Our DB2 database server was installed on the same server as IBM® BAW, so we can use the internal localhost interface for communication.
Do not use the localhost interface when the database server is on a different machine.
Also pay attention to the additional parameters:
bpm.de.db.4.schema=DOSSA- the name of the schema in which the tables will be placed different than the user name.bpm.de.db.4.tsdosdata=DOSSA_DATA_TS- the tablespace for data.bpm.de.db.4.tsdoslob=DOSSA_LOB_TS- tablespace for LOBs.bpm.de.db.4.tsdosidx=DOSSA_IDX_TS- tablespace for indexes.
Do not leave the bpm.de.db.4.databaseDataDirectoryPath parameter unset. If you do not set it, the generated database and tablespace creation scripts will be created incorrectly, but you will only find out about it when you want to run them on the database server. What value should you set?
Based on the documentation article Directory structure - default local database directory information for DB2 instance db2inst1,
the default value is ~db2inst1/db2inst1/NODE0000. Execute the commands as user db2inst1 on the database server:
cd
HOME_DIR=`pwd`
echo "$HOME_DIR/db2inst1/NODE0000"

So, in our case it will be the value /opt/IBM/db2/db2inst1/db2inst1/NODE0000.
##############################
# Database properties: DosDb #
##############################
# The keyword to use to refer to this set of database properties. This is not the database name.
bpm.de.db.4.name=DosDb
# The list of available options depends on the product configuration. For a Standard DE, the options are
# ProcessServer, EmbeddedECM, ContentNavigator, DesignObjectStore, TargetObjectStore, PDW, Messaging, and BusinessSpace.
# For an Advanced DE, the options are ProcessServer, EmbeddedECM, ContentNavigator, DesignObjectStore, TargetObjectStore,
# PDW, CellScopedDB, Messaging, BusinessSpace, CommonDB, and BPC. For an AdvancedOnly DE, the options are CellScopedDB,
# Messaging, BusinessSpace, CommonDB, and BPC. For EmbeddedECM, there is no support if the operating system for the
# IBM Business Automation Workflow environment is z/OS.
bpm.de.db.4.dbCapabilities=DesignObjectStore
# Options: DB2, DB2zOS, Oracle, or SQL Server.
bpm.de.db.4.type=DB2
# The host name of the database. Do not use localhost for environments that span multiple hosts.
bpm.de.db.4.hostname=localhost
bpm.de.db.4.portNumber=50000
# The name of the database.
bpm.de.db.4.databaseName=CPEDB
# For information about the restrictions that pertain to IBM Business Automation Workflow database schema names,
# see the IBM Business Automation Workflow topic "Configuration properties for the BPMConfig command" in the IBM Knowledge Center:
# https://www.ibm.com/support/knowledgecenter/SS8JB4_18.0.0/com.ibm.wbpm.ref.doc/topics/samplecfgprops.html
bpm.de.db.4.schema=DOSSA
bpm.de.db.4.tsdosdata=DOSSA_DATA_TS
bpm.de.db.4.tsdoslob=DOSSA_LOB_TS
bpm.de.db.4.tsdosidx=DOSSA_IDX_TS
# The database data directory is the location where information that is managed by the database is stored.
# Specify the same data directory for each bpm.de.db.databaseDataDirectoryPath.
bpm.de.db.4.databaseDataDirectoryPath=/opt/IBM/db2/db2inst1/db2inst1/NODE0000
Database definition TosDb
The TosDb database is used by the "Target Object Store", a product of IBM Filenet P8, a document repository.
Our DB2 database server was installed on the same server as IBM® BAW, so we can use the internal localhost interface for communication.
Do not use the localhost interface when the database server is on a different machine.
Also pay attention to the parameters:
bpm.de.db.5.schema=TOSSA- the name of the schema in which the tables will be placed different than the user name.bpm.de.db.5.tsdosdata=TOSSA_DATA_TS- the tablespace for data.bpm.de.db.5.tsdoslob=TOSSA_LOB_TS- tablespace for LOBs.bpm.de.db.5.tsdosidx=TOSSA_IDX_TS- tablespace for indexes.
Do not leave the bpm.de.db.5.databaseDataDirectoryPath parameter unset. If you do not set it, the generated database and tablespace creation scripts will be created incorrectly, but you will only find out about it when you want to run them on the database server. What value should I set?
Based on the documentation article Directory structure - default local database directory information for DB2 instance db2inst1,
the default value is ~db2inst1/db2inst1/NODE0000. Execute the commands as user db2inst1 on the database server:
cd
HOME_DIR=`pwd`
echo "$HOME_DIR/db2inst1/NODE0000"

So, in our case it will be the value /opt/IBM/db2/db2inst1/db2inst1/NODE0000.
##############################
# Database properties: TosDb #
##############################
# The keyword to use to refer to this set of database properties. This is not the database name.
bpm.de.db.5.name=TosDb
# The list of available options depends on the product configuration. For a Standard DE, the options are
# ProcessServer, EmbeddedECM, ContentNavigator, DesignObjectStore, TargetObjectStore, PDW, Messaging, and BusinessSpace.
# For an Advanced DE, the options are ProcessServer, EmbeddedECM, ContentNavigator, DesignObjectStore, TargetObjectStore,
# PDW, CellScopedDB, Messaging, BusinessSpace, CommonDB, and BPC. For an AdvancedOnly DE, the options are CellScopedDB,
# Messaging, BusinessSpace, CommonDB, and BPC. For EmbeddedECM, there is no support if the operating system for the
# IBM Business Automation Workflow environment is z/OS.
bpm.de.db.5.dbCapabilities=TargetObjectStore
# Options: DB2, DB2zOS, Oracle, or SQL Server.
bpm.de.db.5.type=DB2
# The host name of the database. Do not use localhost for environments that span multiple hosts.
bpm.de.db.5.hostname=localhost
bpm.de.db.5.portNumber=50000
# The name of the database.
bpm.de.db.5.databaseName=CPEDB
# For information about the restrictions that pertain to IBM Business Automation Workflow database schema names, see the IBM Business Automation Workflow topic
# "Configuration properties for the BPMConfig command" in the IBM Knowledge Center:
# https://www.ibm.com/support/knowledgecenter/SS8JB4_18.0.0/com.ibm.wbpm.ref.doc/topics/samplecfgprops.html
bpm.de.db.5.schema=TOSSA
bpm.de.db.5.tstosdata=TOSSA_DATA_TS
bpm.de.db.5.tstoslob=TOSSA_LOB_TS
bpm.de.db.5.tstosidx=TOSSA_IDX_TS
# The database data directory is the location where information that is managed by the database is stored.
# Specify the same data directory for each bpm.de.db.databaseDataDirectoryPath.
bpm.de.db.5.databaseDataDirectoryPath=/opt/IBM/db2/db2inst1/db2inst1/NODE0000
PerformanceDb database definition
The PerformanceDb database is used by the "Performance Data Warehouse".
Our DB2 database server was installed on the same server as IBM® BAW, so we can use the internal localhost interface for communication.
Do not use the localhost interface when the database server is on a different machine.
The PerformanceDb database schema should be the same as the technical user name used to communicate with the database,
in our case it takes the value bpmadmin.
######################################
# Database properties: PerformanceDb #
######################################
# The keyword to use to refer to this set of database properties. This is not the database name.
bpm.de.db.6.name=PerformanceDb
# The list of available options depends on the product configuration. For a Standard DE, the options are
# ProcessServer, EmbeddedECM, ContentNavigator, DesignObjectStore, TargetObjectStore, PDW, Messaging, and BusinessSpace.
# For an Advanced DE, the options are ProcessServer, EmbeddedECM, ContentNavigator, DesignObjectStore, TargetObjectStore,
# PDW, CellScopedDB, Messaging, BusinessSpace, CommonDB, and BPC. For an AdvancedOnly DE, the options are CellScopedDB,
# Messaging, BusinessSpace, CommonDB, and BPC. For EmbeddedECM, there is no support if the operating system for the
# IBM Business Automation Workflow environment is z/OS.
bpm.de.db.6.dbCapabilities=PDW
# Options: DB2, DB2zOS, Oracle, or SQL Server.
bpm.de.db.6.type=DB2
# The host name of the database. Do not use localhost for environments that span multiple hosts.
bpm.de.db.6.hostname=localhost
bpm.de.db.6.portNumber=50000
# The name of the database.
bpm.de.db.6.databaseName=PDWDB
# For information about the restrictions that pertain to IBM Business Automation Workflow database schema names,
# see the IBM Business Automation Workflow topic "Configuration properties for the BPMConfig command" in the IBM Knowledge Center:
# https://www.ibm.com/support/knowledgecenter/SS8JB4_18.0.0/com.ibm.wbpm.ref.doc/topics/samplecfgprops.html
bpm.de.db.6.schema=bpmadmin
CellOnlyDb database definition
The CellOnlyDb database is used by "IBM Business Automation Workflow".
Our DB2 database server was installed on the same server as IBM® BAW, so we can use the internal localhost interface for communication.
Do not use the localhost interface when the database server is on a different machine.
The CellOnlyDb database schema should be the same as the technical user name used to communicate with the database,
in our case it takes the value bpmadmin.
For the "Express" and "Standard" versions, the bpm.cell.db=CellOnlyDb parameter should be commented out. This also applies to the entire section below.
###################################
# Database properties: CellOnlyDb #
###################################
# The keyword to use to refer to this set of database properties. This is not the database name.
bpm.de.db.7.name=CellOnlyDb
# The list of available options depends on the product configuration. For a Standard DE, the options are
# ProcessServer, EmbeddedECM, ContentNavigator, DesignObjectStore, TargetObjectStore, PDW, Messaging, and BusinessSpace.
# For an Advanced DE, the options are ProcessServer, EmbeddedECM, ContentNavigator, DesignObjectStore, TargetObjectStore,
# PDW, CellScopedDB, Messaging, BusinessSpace, CommonDB, and BPC. For an AdvancedOnly DE, the options are CellScopedDB,
# Messaging, BusinessSpace, CommonDB, and BPC. For EmbeddedECM, there is no support if the operating system for the
# IBM Business Automation Workflow environment is z/OS.
bpm.de.db.7.dbCapabilities=CellScopedDB
# Options: DB2, DB2zOS, Oracle, or SQL Server.
bpm.de.db.7.type=DB2
# The host name of the database. Do not use localhost for environments that span multiple hosts.
bpm.de.db.7.hostname=localhost
bpm.de.db.7.portNumber=50000
# The name of the database.
bpm.de.db.7.databaseName=CMNDB
# For information about the restrictions that pertain to IBM Business Automation Workflow database schema names,
# see the IBM Business Automation Workflow topic "Configuration properties for the BPMConfig command" in the IBM Knowledge Center:
# https://www.ibm.com/support/knowledgecenter/SS8JB4_18.0.0/com.ibm.wbpm.ref.doc/topics/samplecfgprops.html
bpm.de.db.7.schema=bpmadmin
Case Manager Configuration
The IBM BAW product also includes the IBM® Case Manager product. The configuration section for this product is shown below. We do not change anything in this section unless we have a need to.
###########################
# Case Manager Properties #
###########################
# The network directory shared among multiple process servers in the deployment environment.
bpm.de.caseManager.networkSharedDirectory=${WAS_INSTALL_ROOT}/CaseManagement/properties
bpm.de.caseManager.formsType=eForms only
bpm.de.caseManager.ibmFormsDirectory=
bpm.de.caseManager.ibmFormsRenderApp=autoDetect
bpm.de.caseManager.ibmFormsTranslatorURL=http://localhost:8085/translator
bpm.de.caseManager.enablePD=false
bpm.de.caseManager.enableVCS=false
bpm.de.caseManager.vcsSandboxPath=
bpm.de.caseManager.vcsAdditionalParameters=
bpm.de.caseManager.vcsHeartbeatInterval=60
bpm.de.caseManager.vcsCommitTimeout=120
bpm.de.caseManager.vcsDeliverTimeout=600
Generating files that create a database
After preparing the configuration file, we will generate scripts that create databases, schemas, and tablespaces. To do this, we will perform the following steps:
- We create a directory in which the scripts will be generated:
cd ~
mkdir -p workspace/createDbScripts
- We generate scripts using commands:
# We go to the location of the previously defined configuration file
cd ~/workspace/config
/opt/IBM/BAW/21.0.3/bin/BPMConfig.sh \
 -create -sqlfiles bpmbaw21test-PC-SingleCluster-DB2.properties \
 -outputDir ~/workspace/createDbScripts
The command should exit with the message: The BPMConfig.sh -create -sqlfiles bpmbaw21test-PC-SingleCluster-DB2.properties -outputDir /opt/IBM/BAW/bawadmin/workspace/createDbScripts command completed successfully.
- We pack the resulting directories with files and send them to the server with the database (in our case it's the same server 😁,
localhost):
cd ~/workspace/createDbScripts/
tar -czvf createDbScripts.tar.gz *
scp createDbScripts.tar.gz db2inst1@localhost:createDbScripts.tar.gz
Creating databases
Log in to the database server and issue commands as user db2inst1.
db2inst1If you are logged in as privileged user root issue the command:
su - db2inst1
- Loading the
db2inst1user profile allowing local communication with the database installation.
. ~/sqllib/db2profile
- If we have completed all the previously described steps, we should have the file
createDbScripts.tar.gzin our home directory - a file from the archive containing scripts that create databases, necessary schemas and tablespaces. We create a directory to which we will unpack the given file:
mkdir -p ~/createDbScripts
cd ~/createDbScripts
tar -xzvf ~/createDbScripts.tar.gz
- One by one, we create the four necessary databases (BPMDB, PDWDB, CMNDB, and CPEDB) and tablespaces in which the objects will be stored.
The generated database creation scripts have the territory set to US by default. We may wonder whether we should change this.
The supported code values can be found in the product documentation in the article Supported territory codes and code pages.
We search the directories for the SQL files responsible for creating the database: files named createDatabase.sql (for the CPEDB database createDatabase_ECM.sql) and make changes.
For example, for the BPMDB database, we set the territory to PL:
-- create the database:
create database BPMDB automatic storage yes  using codeset UTF-8 territory PL pagesize 32768;
Among the script directories you will find a directory PCCell1/DB2/CMNDB which you can ignore. Its duplicate content can be found in the directory PCCell1.De1/DB2/CMNDB.
Run commands:
cd ~/createDbScripts/PCCell1.De1/DB2/BPMDB
./createDatabase.sh
cd ~/createDbScripts/PCCell1.De1/DB2/PDWDB
./createDatabase.sh
cd ~/createDbScripts/PCCell1.De1/DB2/CMNDB
./createDatabase.sh
cd ~/createDbScripts/PCCell1.De1/DB2/CPEDB
./createDatabase_ECM.sh
db2 connect to CPEDB
db2 -stf ./createTablespace_Advanced.sql
The above set of commands will ensure that we create the databases correctly.
For our needs, we only run the above, necessary database and tablespace creation scripts.
We do not run scripts that create tables and procedures. In the previously created profile configuration file, we set the parameter bpm.de.deferSchemaCreation=false,
which will ensure that the necessary objects are created during the process of building WebSphere profiles.
Creating BAW profiles
We are at the end. All that remains is to create WebSphere profiles.
Verifying the correctness of the configuration
Before running the command to create profiles, it is worth checking whether the data contained in the configuration file is correct. The verification that is run not only validates the correctness of the syntax, but also checks the possibility of connecting to the required databases. So we issue the command:
cd ~/workspace/config
/opt/IBM/BAW/21.0.3/bin/BPMConfig.sh -validate bpmbaw21test-PC-SingleCluster-DB2.properties
The command should exit with the message: The BPMConfig.sh -validate bpmbaw21test-PC-SingleCluster-DB2.properties command completed successfully.
Starting configuration
If we have successfully passed validation, there is nothing to prevent us from starting the creation of profiles.
cd ~/workspace/config
/opt/IBM/BAW/21.0.3/bin/BPMConfig.sh -create -de bpmbaw21test-PC-SingleCluster-DB2.properties
The command should end with the message: The BPMConfig.sh -create -de bpmbaw21test-PC-SingleCluster-DB2.properties command completed successfully.
Creating all components, database schemas with tables and stored procedures, deployment profile and node with server takes at least 2 hours.
IBM® BAW Startup Script
To make our work easier, we can create a script that starts individual components of the IBM® BAW product.
To do this, as the bawadmin user, create the /opt/IBM/BAW/bin directory and the start-stop-server.sh file in it:
mkdir -p /opt/IBM/BAW/bin
cd /opt/IBM/BAW/bin
vim start-stop-server.sh
In the file start-stop-server.sh we enter:
#!/bin/bash
#set -x
echo "Service De1 Process Center - $1"

USER='bawadmin'
PASS='secret'
WEBSPHERE_PROFILES=/opt/IBM/BAW/profiles
ulimit -n 8192


start()
{
        $WEBSPHERE_PROFILES/DmgrProfile/bin/startServer.sh dmgr
        $WEBSPHERE_PROFILES/Node1Profile/bin/startNode.sh
        $WEBSPHERE_PROFILES/Node1Profile/bin/startServer.sh SingleClusterMember1
}

stop()
{
        $WEBSPHERE_PROFILES/Node1Profile/bin/stopServer.sh SingleClusterMember1 -username $USER -password $PASS
        $WEBSPHERE_PROFILES/Node1Profile/bin/stopNode.sh -username $USER -password $PASS
        $WEBSPHERE_PROFILES/DmgrProfile/bin/stopServer.sh dmgr -username $USER -password $PASS

}

startServer()
{
        $WEBSPHERE_PROFILES/Node1Profile/bin/startServer.sh SingleClusterMember1
}

stopServer()
{
        $WEBSPHERE_PROFILES/Node1Profile/bin/stopServer.sh SingleClusterMember1 -username $USER -password $PASS
}

case "$1" in
        start)
                start
                ;;
        stop)
                stop
                ;;
        startServer)
                startServer
                ;;
        stopServer)
                stopServer
                ;;
        restart)
                stop
                start
                ;;
        *)
                echo "Usage: $0 {start|stop|restart|startServer|stopServer}"
esac
We change the permissions of the start-stop-server.sh file so that only the owner can run the script:
chmod u+x start-stop-server.sh
Now as user bawadmin we can start services using the command:
/opt/IBM/BAW/bin/start-stop-server.sh start
or stop them with the command:
/opt/IBM/BAW/bin/start-stop-server.sh stop
Summary
Summary of the operations we performed.
Access addresses of installed services
After successfully completing the installation and configuration of the IBM® BAW product, we have the following services available
(list prepared for the service server named bpmbaw21test.example.com, replace this name with the appropriate one for you):
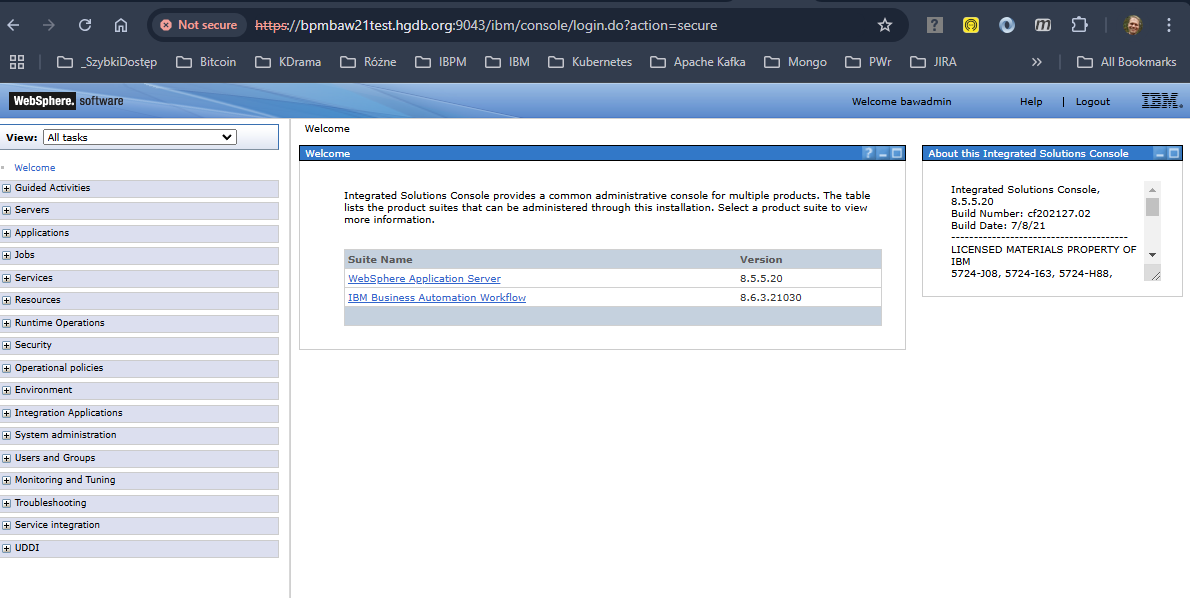
- WebSphere Integrated Solutions Console: access as user
bawadminhttps://bpmbaw21test.example.com:9043/ibm/console - Process Center (BPM): access as user
bawadminhttps://bpmbaw21test.example.com:9443/ProcessCenter - Process Portal (BPM): access as user
bawadminhttps://bpmbaw21test.example.com:9443/portal - Process Admin (BPM): access as user
bawadminhttps://bpmbaw21test.example.com:9443/ProcessAdmin - Process Designer (BPM): access as user
bawadminhttps://bpmbaw21test.example.com:9443/WebPD - Workflow Center (BAW): access as user
bawadminhttps://bpmbaw21test.example.com:9443/WorkflowCenter - Content Navigator (FileNet): access as user
deadminhttps://bpmbaw21test.example.com:9443/acce/
Directory tree of installed products
Below is a tree of the most important directories containing the components of the IBM® BAW product, which we obtained as a result of this installation process. I have highlighted the directories that make up the IBM® BAW product. The remaining folders are related to the DB2 database installation.
/
├── opt
|   ├── .ibm
|   └── IBM
|       ├── BAW
|       |   ├── 21.0.3
|       |   ├── bawadmin
|       |   |   └── var
|       |   |       └── ibm
|       |   |           └── InstallationManager
|       |   ├── bin
|       |   ├── IMShared
|       |   ├── InstallationManager
|       |   └── profiles
|       |       ├── DmgrProfile
|       |       └── Node1Profile
|       ├── db2
|       |   ├── AppServer
|       |   ├── bin
|       |   ├── bpmadmin
|       |   ├── dasusr1
|       |   ├── db2fenc1
|       |   ├── db2inst1
|       |   |   └── db2inst1
|       |   |       └── NODE0000
|       |   ├── IMShared
|       |   └── InstallationManager
|       └── install
└── var
    └── ibm
        └── InstallationManager
Standard listening port list
The table below contains information about the standard listening ports used by services.
Very useful data when you need to configure a firewall. In this case, we will be most interested in the ports
used by application services named WC_defaulthost and WC_defaulthost_secure.
For administrative purposes, the ports WC_adminhost_secure and SOAP_CONNECTOR_ADDRESS will be needed.
| Profile | Port name | Port |
|---|---|---|
| Dmgr | WC_adminhost_secure | 9043 |
| Dmgr | SOAP_CONNECTOR_ADDRESS | 8879 |
| Node1 | BOOTSTRAP_ADDRESS | 9810 |
| Node1 | SOAP_CONNECTOR_ADDRESS | 8880 |
| Node1 | ORB_LISTENER_ADDRESS | 9101 |
| Node1 | SAS_SSL_SERVERAUTH_LISTENER_ADDRESS | 9404 |
| Node1 | CSIV2_SSL_SERVERAUTH_LISTENER_ADDRESS | 9405 |
| Node1 | CSIV2_SSL_MUTUALAUTH_LISTENER_ADDRESS | 9406 |
| Node1 | WC_adminhost | 9061 |
| Node1 | WC_defaulthost | 9080 |
| Node1 | DCS_UNICAST_ADDRESS | 9354 |
| Node1 | WC_adminhost_secure | 9044 |
| Node1 | WC_defaulthost_secure | 9443 |
| Node1 | SIP_DEFAULTHOST | 5060 |
| Node1 | SIP_DEFAULTHOST_SECURE | 5061 |
| Node1 | OVERLAY_UDP_LISTENER_ADDRESS | 11007 |
| Node1 | OVERLAY_TCP_LISTENER_ADDRESS | 11008 |
| Node1 | IPC_CONNECTOR_ADDRESS | 9633 |
| Node1 | SIB_ENDPOINT_ADDRESS | 7276 |
| Node1 | SIB_ENDPOINT_SECURE_ADDRESS | 7286 |
| Node1 | SIB_MQ_ENDPOINT_ADDRESS | 5558 |
| Node1 | SIB_MQ_ENDPOINT_SECURE_ADDRESS | 5578 |
Next configuration steps
In the next steps you should:
- Configure the correct SSL certificates for the HTTPS protocol.
- Configure authentication and authorization based on the LDAP/AD user repository.
- Configure the Case Builder and Case Client services related to Case Management.
But I will describe how to do this in the next articles.